Razor Sharp
Razor Sharp 8" Extreme Edge Making System
- SKU:
- 530110
- Availability:
- This item usually ships within 24 business hours.
- Weight:
- 4.10 LBS
Description
The Razor Sharp 8" extreme edge making system will have you up and sharpening knives in no time.
This system fits a standard bench grinder. You'll get quick results and be able to put a razor sharp honed and polished finish on tools in just seconds.
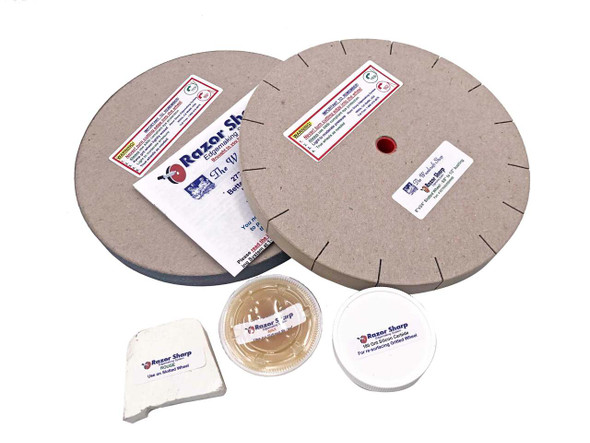
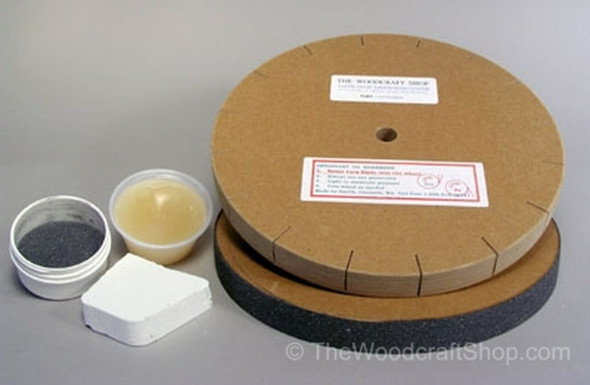
The Razor Sharp 8" Extreme Edge Making System Consists of:
- One grinding wheel 8" x 1 1/4".
- The grinding wheel is silicone carbide gritted. 180 grit.
- One buffing wheel that is slotted 8" x 1 1/4"". 5/8" bore on both wheels, there is a removable bushing for 1/2" shaft machines that comes with them.
- A package of extra silicone carbide grit.
- Enough for 15-20 extra wheel coatings. Jeweler's rouge. Conditioning wax.
The Razor Sharp Edgemaking system is a tool that allows you to put a razor sharp edge on your knives and tools in just seconds. The system consists of two 8"x3/4" grit wheels with a 5/8" arbor hole. The bushing installed in the wheels converts them to a 1/2" arbor hole. The slotted wheel needs to be "dressed" occasionally with 60 grit sandpaper. The wheels are meant to be used on any ordinary bench grinder that turns over 3000 RPMs. You will be able to sharpen many knives or tools before needing to re-surface the grit wheel.
How to install the Wheels
- To install the wheels on the Razor Sharp edge making system, you will need to remove the guards from your bench grinder.
- Then, install the gritted wheel on the right side of the motor and turn it by hand to see if there are any bumps or nodules. If there is, take something blunt like the corner of a flat file and, with the motor running, just touch the wheel to remove any bumps.
- Next, take the conditioning wax (yellow) out of the cup and rub it sparingly on the gritted wheel so that you can just see it.
- You should still be able to see the grit through the wax. Each time you start to sharpen, hold the wax on the wheel for a brief second.
- Eventually, wax will build up and you will not see the grit at all. The surface will be shiny and waxy
- Be careful not to use too much wax. Doing so will destroy the effectiveness of the grit.
- Align the wheel slots on the Razor Sharp with the screws on the guide rail.
- Insert the screws into the guide rail.
- Tighten the screws using a screwdriver. Do not over-tighten the screws - snug is enough.
- Apply a little Rouge (white) to the wheel and touch it to the Razor Sharp.
- Spin the wheels by hand. If a wheel wobbles from side to side, you probably have a bent washer!
- To get rid of the wobble, loosen the nut and turn the washer, or washers, just a little. Turn one washer one way and the other washer the other way.
- Snug the nut and spin the wheel. You might have to repeat this a time or two to minimize the spin out.
- A little side to side deviation won't hurt anything!
- Sometimes, if a wheel is exposed to heat, or dampness, it will warp a little. To fix this place the wheel or wheels between two boards, clamp them tightly and keep in a cool dry place for a few hours.
How to True the Wheels
To true the wheels on the Razor Sharp edge making system, you will need to adjust them back to their original position. Sometimes the wheels may be a little "out of round", but this can be fixed by using the grit wheel. If the slotted wheel seems out of round, it can be trued at any time. You may "round" the corners of the slotted wheel if you sharpen a lot of serrated knives.
One way to correct the out-of-roundness on a wheel is to use 60 grit sandpaper. Wrap the sandpaper around a flat piece of metal and hold it lightly against the face of the wheel. You will feel the "high" spot. When it feels smooth, keep holding it lightly against the wheel. The wheel will be nice and flat across the face once the "high" spot is removed.
Are you getting ready to sharpen your tool?
It's important to think about the angle you want on your knife or tool. The angle you choose depends on what you're going to use the edge for. If you're going to chop, dig, or scrape with your blade, a 35-40 degree angle is usually best. If you're going to use the knife for shaving or rotary cutting, a "flat" angle of 10-15 degrees is better. Most knives have an angle of 20-25 degrees. With practice, you'll learn what angle works best for you.
When it comes to sharpening your blade, it's important to hold it at the right angle.
The best way to do this is to hold the blade or tool horizontal with the wheel, and then angle it so that the edge is facing the wheel and about halfway down the face of the wheel. Now you are at a 90 degree angle in relation to the axis of the motor. You can think of this as dividing 90 degrees in half, which gives you 45 degrees. This is the angle you use for blades such as an axe, a machete, or a shovel. Another common angle is 22.5 degrees, which is half of 45 degrees. Most knives are sharpened at a 20 to 25 degree angle, which is half of 22.5 degrees. Just remember to divide everything in half to find the right angle for your blade!
When sharpening a knife, it is important to hold the tool correctly in order to achieve the desired angle. First, apply wax to the face of the grit wheel. Next, hold the knife up to the wheel and carefully pick the angle you would like to sharpen at (90-45-22.5-11.5). We recommend practicing with "junk" knives before using your actual blades. It is also important not to turn the blade into the wheel, as this can cause damage to both the knife and the tool.
The aim is to feel a “burr” or “wire edge” which means that the two sides of the blade's edge have come together. Once you've created this burr, it's important to make sure it runs all the way from the hilt to the tip. Just a little “burr” is all you need. When making the passes across the grit, start at the hilt and go to the tip without stopping. Also, pull the tip away from the wheel when it is at about the middle of the grit. If you pass the tip clear across the wheel, you may round the tip of the blade. It is good to keep a wadded up paper towel in hand to wipe off the wax that is now on the blade. This will make it easier to feel the “burr” or “wire edge”.
A "burr" tells you that enough metal has been removed. When sharpening the old way on a stone, like our grandfathers did, one never knew when enough metal had been taken off. One just kept rubbing the knife on the stone until one thought it was sharp enough! Occasionally a knife will not develop a “burr”. Instead there is a “hair” on the edge that you can see. We call this “angle hair” or a “feather edge”.
Removing a burr or feather edge from a tool can be a challenging task. However, by following these simple steps you can get your tool back to its former glory in no time. First, take the Jeweler's Rouge and rub it lightly on the face of the slotted or plain wheel. This will create heat and help polish the blade. Remember to keep the angle consistent and to alternate sides as you make passes. After a few passes, wipe off the blade and take a look. If it is still not sharp enough, continue repeating these steps until it is razor sharp!
When using the grit wheel, it is important to keep the edge moving in order to prevent heat buildup. In addition, be sure to keep the wheel coated with wax or rouge, depending on which wheel you are using. If your knife has nicks or other bad spots, you can fix these on the grit wheel . You can even put a new tip on the knife if the old one is broken.


